Locations
| THE MAIN ITEMS | |
|---|---|
| Locations | |
| Objects | |
| Tasks | |
| Characters | |
| Events | |
| Variables | |
| Groups | |
| Properties | |
| Text Overrides | |
| Hints | |
| Synonyms | |
| User functions | |
Adventure games are usually based around a series of locations that the player can move between and explore.
These locations can be rooms of a house, chambers and tunnels in a cave system, or outdoor locations such as streets and fields.
Different locations are linked together in such a way that the player can move between them by asking to move in a particular direction. Eight compass directions (north, northeast, east etc.) are provided as well as up/down and in/out to allow moving in any direction. Both the Developer and Runner display a map of the locations, with the connections between them shown as a conecting line.
Locations were previously named 'Rooms' in version 4.0.
Locations can be added by clicking on the Locations icon on the Home tab of the ribbon, by double-clicking on the map, or by right-clicking in an item list and selecting Add Location or Add New > Location, depending on the list.
Description
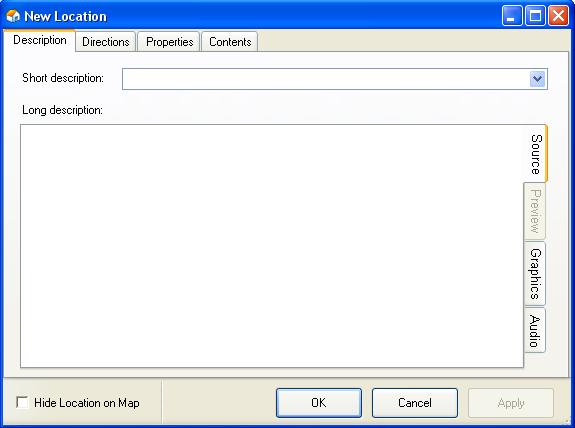
Creating a new location brings up a dialog box as follows:
At a very basic level, locations need two things; a Short description and a Long description.
Short descriptions are essentially a label for the location. These will be displayed on the map, and at the bottom of the screen when playing the game, to show which location you are currently at.
Under most circumstances, the short description of a room will stay the same throughout the game. However, there may be times when you need this to change during play. To do this, click on the down arrow to the right of the short description. This will drop down a source text box, where you can add alternate descriptions depending on different circumstances.
The long description is the text that will be displayed when the player moves into a room, and when they 'look' in the room. Again, you can add alternate descriptions so the text will change depending on what happens during play.
Directions
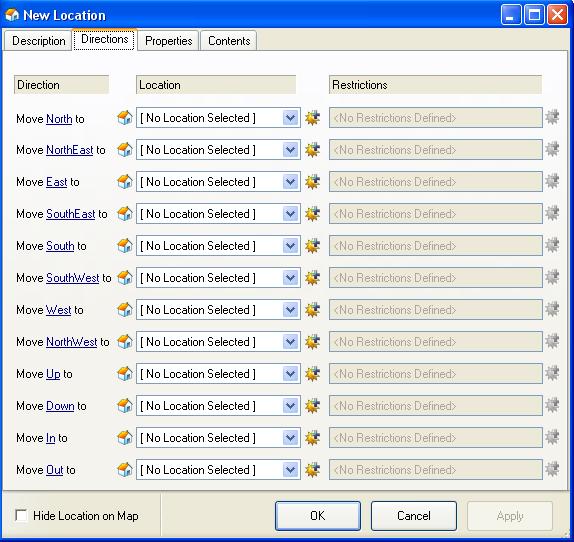
The Directions tab contains a list of each of the 12 possible directions you can move in ADRIFT. By default, each direction displays a dropdown with a list of locations. Picking a location from this list will create one-way link from the current location to the selected location.
When you click OK you will be asked if you want to make the link reciprocal, i.e. you want it to be a 2-way link so that moving in the opposite direction from the selected location will bring you back to the current location. If you check the Remember this setting checkbox and select Yes, the 2-way link will be created every time you link 2 locations. You can change this setting at any time by going to Settings and changing the value for Copy reciprocal links.
Rather than simply move from one location to another, you may want the player to move to a random location when they exit a particular location in a particular direction. To do this, click on the little icon of a house to the left of the location dropdown. This will change the list type from Locations to Groups. Then, instead of selecting a location, you select a location group. During play, the player will be moved to a random location within this group. Simply click on the group icon to toggle the list back to locations.
Once a location or group has been selected, the restrictions dropdown will become enabled. There will be many circumstances where you want to restrict the player from moving in a direction. This might be, for example, a door is closed, the player isn't carrying something, or a task hasn't been completed. To create a restriction, click on the 'new' icon to the right of the restrictions summary. This will bring up the Restrictions form where you can specify whatever restrictions you wish on the movement in that direction. By default, this will add a single restriction. If you wish to add more restrictions, or edit the restriction you just created, click on the 'edit' icon to the right of the restrictions summary. This will bring up the restrictions list form where you can modify your restrictions.
Again, as with the location links themselves, if the link is 2 way (i.e. the location you are linking to also links back to the location you are editing) you will be prompted whether you wish to copy the restriction onto the other location. This is useful if, for example, the restriction is a door. If the door was closed you would not want to be able to move back without it being open! Again, this setting can be remembered, and can be changed in Settings.
Changing Direction Names
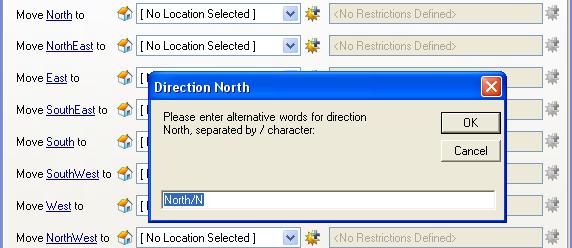
You may have noticed that each of the directions on the Directions tab-page is an underlined hyperlink. If you click on one of these it will open a dialog box which displays all of the words that the player can type when they want to move in this particular direction. If you click on "North" to open the first entry (which corresponds to movement towards the top of the map) then you will see the words "North" and "N" separated by a slash.
You can add any words you want to this list, for example on a boat you might want North/N/For/Forward/Bow, East/E/Starboard/Right, South/S/Aft/Astern/Stern, and West/W/Port/Left.
- The FIRST word in the list is the word that will be displayed on the Directions tab and is the word that ADRIFT runner will display in any messages to the player.
Contents
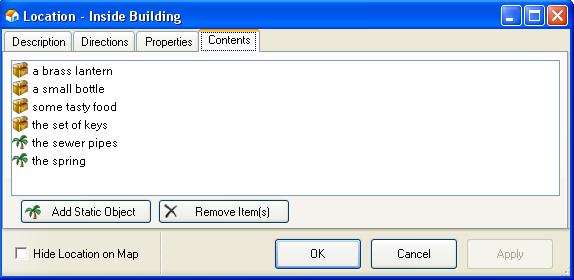
The contents tab shows all of the objects and characters that start the game at this location.
Dynamic objects are shown with a treasure-chest ![]() icon, while static objects are shown with a palm tree
icon, while static objects are shown with a palm tree ![]() icon, and characters as
icon, and characters as ![]() .
.
A button is provided at the bottom to add new static objects to the location.
The "remove items" button does not delete items, it will remove the currently selected character or object from this location and place it in the "Hidden" location.
 To move several existing objects into a location quickly:
- Open the location and switch to the "Contents" tab.
- Open the folder containing the objects.
- To select more than one object, click on the first one then hold down the control key while you click on each of the other objects.
- Position the cursor over one of the selected objects then hold down the mouse button to drag it onto the contents page of the location. This will move all of the selected objects to that location (changing their "Location of the object" and "At location" properties).
- If the Location window disapears behind the main window just drag the object down to the button for the location window on the windows taskbar, wait until the window reappears, then move the cursor onto the location window before releasing the mouse button.
- You can only drag objects from one folder at a time.
Properties
The Short description and Long description on the description page of the location are both properties that are defined in the standard library.
All of the other properties of a location are shown on the properties page of the location, which is shown by clicking on the "Properties" tab at the top of the page.
- The standard library does not define any other properties for locations, so the property page will be empty until you create your own location properties.
 The ADRIFT developer must have Simple mode switched off for the properties tab a location to be available.
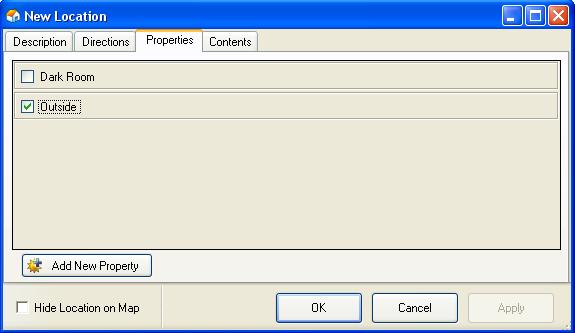
If you were to create two new selection properties for locations called "Dark Room" and "Outside", then the properties page would look like this:
The Properties page allows you to assign Properties to the location. For example, you may want to say a location is a dark room (in which case you might need to have a light source handy to be able to view the location), or you might want to mark the location as being outside (in which case the location might be affected by time of day).
Selecting a property will assign it to the current location. Depending on the property type, this may just be a selection only property, or you may need to assign it a value.
To use the value of a property in an expression or a text box, use a location function.
To add a new property, click the Add New Property button at the bottom of the form. This will bring up the New Property dialog box and default it to "Property of: Locations". Once the property has been applied, it should appear in the list.
| <<< Tutorials: Creating Libraries and Modules | Main_Page | Objects >>> |
